Turkey injection recipe: Best Garlic Herb Butter
A brine turkey recipe using the dry method requires rubbing 1 tablespoon kosher salt per 5 pounds of turkey into the skin, then refrigerating uncovered for 12-72 hours. This draws out moisture while seasoning deeply, resulting in incredibly juicy meat and crispy golden-brown skin when roasted to 165°F (74°C).
Every home cook has experienced it: you spend hours roasting a turkey only to slice into pale, stringy breast meat that tastes like cardboard. No amount of gravy can save it. The dark meat is barely seasoned while the breast is so dry your guests reach for water between bites.
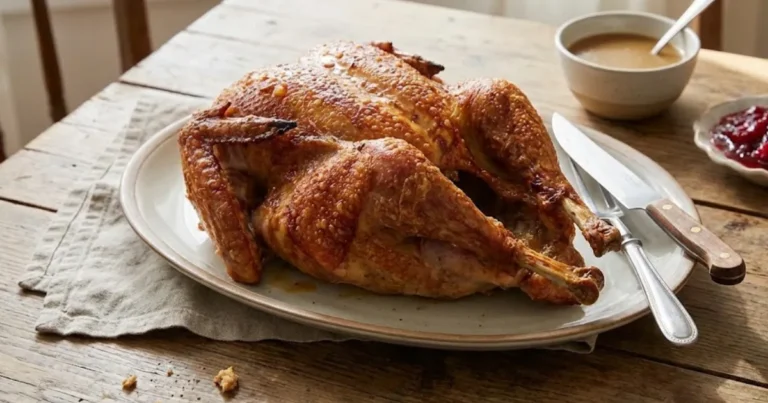
The solution? This brine turkey recipe using the dry brining method transforms any bird into a succulent, deeply flavored centerpiece with impossibly crispy skin. No messy buckets of saltwater, no refrigerator Tetris, no diluted turkey flavor—just pure, juicy perfection.
Why it works: Dry brining uses salt’s natural osmotic power to season the turkey from the inside out. The salt penetrates deep into the muscle fibers, restructuring proteins so they retain moisture during cooking. Meanwhile, the exposed skin air-dries in your refrigerator, creating the crispiest golden-brown exterior you’ve ever achieved.
Preview: Get ready to make this brine turkey recipe your new holiday standard. Once you taste the difference between a dry-brined bird and a regular roasted turkey, there’s no going back.
Why This Brine Turkey Recipe Works
- No equipment needed – No giant containers, coolers, or bags of ice
- Fridge-friendly – Takes up minimal space compared to wet brining
- Deeper seasoning – Salt penetrates throughout instead of just the surface
- Crispiest skin possible – Air-drying creates restaurant-quality crackling skin
- Concentrated flavor – Doesn’t dilute the turkey’s natural taste like wet brining
- Flexible timing – Works in 12 hours but improves up to 3 days
- Foolproof moisture – Salt restructures proteins to hold 20% more liquid
Choosing the Best Turkey
Size Selection: This brine turkey recipe works for any whole turkey 10-20 pounds. Smaller turkeys (10-12 lbs) are ideal for weeknight dinners and dry brine in 12-24 hours. Larger birds (14-20 lbs) need the full 48-72 hours for the salt to penetrate the thicker breast.
Quality Tips: Prioritize air-chilled turkey over water-chilled. Water-chilled turkeys are injected or soaked in cold water during processing, which adds weight (you’re paying for water) and prevents proper browning. Air-chilled birds have drier skin that crisps beautifully. Heritage breeds or pasture-raised organic turkeys have superior flavor and texture—their meat is firmer and richer-tasting.
Fresh vs. Frozen: Either works perfectly for this brine turkey recipe. If using frozen, thaw completely in the refrigerator (1 day per 4 pounds). Critical: Check the label for “pre-seasoned,” “self-basting,” or “enhanced with solution.” These turkeys are already injected with salt water and should NOT be dry brined—you’ll end up with inedibly salty meat.
Prep Safety—Crucial Tip: Do not wash raw turkey. Rinsing poultry under running water creates aerosolized droplets that spray Salmonella and other bacteria across a 3-foot radius onto countertops, dish towels, and utensils. Cooking to the proper internal temperature of 165°F kills all pathogens—water cannot. Pat the turkey dry with paper towels instead, then wash your hands thoroughly with soap and hot water for 20 seconds.
Ingredients List
| Quantity | Ingredient |
|---|---|
| 1 (12-14 lb) | Whole Turkey (fresh or thawed) |
| 3 tbsp | Kosher Salt (Diamond Crystal preferred) |
| 1 tbsp | Brown Sugar (optional, for browning) |
| 2 tsp | Black Pepper (freshly ground) |
| 2 tsp | Garlic Powder |
| 1 tsp | Onion Powder |
| 1 tsp | Dried Thyme |
| 1 tsp | Smoked Paprika |
| ½ tsp | Cayenne Pepper (optional) |
| 3 tbsp | Unsalted Butter (melted, for roasting) |
| 2 tbsp | Olive Oil (for roasting) |
Ingredient Notes
The Salt (Kosher vs. Table): This is critical—kosher salt is required for dry brining. Diamond Crystal kosher salt has large, flaky crystals that dissolve slowly, giving you time to distribute evenly. Morton’s kosher salt is denser; if using it, reduce the amount by 25%. Never use table salt—its fine grains over-salt the turkey and create an unpleasantly mineral taste. The general rule: 1 tablespoon kosher salt per 5 pounds of turkey.
The Sugar (Optional Browning Boost): Brown sugar isn’t necessary for moisture but enhances caramelization during roasting, giving you deeper golden-brown skin. The small amount (1 tablespoon for a whole turkey) doesn’t make the bird sweet—it just accelerates the Maillard reaction for richer color and flavor.
The Aromatics (Garlic, Thyme, Paprika): These spices don’t penetrate like salt does, but they create a flavorful crust on the skin. Smoked paprika adds gorgeous color while garlic and thyme provide savory depth. Apply these after the initial salt-only brining period for best results.
The Fat (Butter & Oil): Applied just before roasting, this fat mixture carries flavor, promotes browning, and creates an impermeable barrier that traps moisture inside the turkey. Butter provides rich taste; olive oil prevents burning during the high-heat start.
Step-by-Step Instructions
Recipe Card
🛠 Equipment Needed
- Rimmed baking sheet
- wire rack
- roasting pan
- instant-read thermometer
- basting brush
- fat separator
Prep: Applying the Dry Brine
Remove turkey from packaging and remove the giblets and neck from the cavity. Pat the entire turkey completely dry inside and out with paper towels—this step is non-negotiable. Any moisture prevents the salt from adhering and the skin from crisping later.
Place turkey on a wire rack set inside a rimmed baking sheet. This allows air circulation all around the bird.
In a small bowl, mix kosher salt with brown sugar (if using). Starting with the breast, sprinkle the salt mixture all over the turkey—skin, cavity, legs, wings, everywhere. Use your hands to rub it in thoroughly, ensuring even coverage. Don’t be timid; the salt needs to coat every surface.
Refrigerate uncovered for 12-72 hours. The exposed skin will dry out and turn slightly leathery—this is exactly what you want. For a 12-14 lb turkey, 24-48 hours is ideal. Larger birds benefit from the full 72 hours.
The Cook: Roasting the Brined Turkey
30 minutes before roasting, remove turkey from the refrigerator. Let it sit at room temperature while you preheat the oven to 425°F (220°C) with the rack in the lower third position.
Pat the turkey dry once more if any moisture has accumulated. Do not rinse off the salt—it’s been absorbed into the meat. Mix the spice rub (pepper, garlic powder, onion powder, thyme, paprika, cayenne) and sprinkle over the skin. Brush the entire turkey with melted butter mixed with olive oil.
Place turkey breast-side up on a roasting rack in a large roasting pan. Tuck wing tips under the body. Add 2 cups water or broth to the bottom of the pan to prevent drippings from burning.
Roast at 425°F for 30 minutes to jump-start browning. Reduce heat to 325°F (163°C) and continue roasting for 1½-2½ hours more (total cooking time is 13-15 minutes per pound). Baste with pan drippings every 45 minutes.
The Doneness Test
Juices should run clear when you pierce the thickest part of the thigh. Critical: Insert an instant-read meat thermometer into the deepest part of the thigh without touching bone. It must read exactly 165°F (74°C). Check the thickest part of the breast as well—it should also register 165°F.
If the skin browns too quickly before the meat reaches temperature, tent loosely with foil and continue roasting. Temperature, not time, determines doneness. Oven variations, turkey shape, and starting temperature all affect cooking time.
Resting: The Make-or-Break Step
Transfer turkey to a cutting board and let it rest for 30-40 minutes before carving. This resting period is mandatory—it allows the muscle fibers to relax and reabsorb juices. If you carve immediately, those precious juices (which the brine worked so hard to preserve) spill onto the cutting board instead of staying in the meat.
Tent loosely with foil during resting. The turkey will stay hot—internal temperature actually rises another 5-10 degrees during this time, which is why you can remove it at exactly 165°F rather than overshooting.
3 Secrets for Never-Dry Turkey
Tip 1: Longer Brine Time = More Insurance: The 12-hour minimum works, but 48-72 hours gives you foolproof results. The extended time allows salt to penetrate the densest breast meat, restructuring proteins so they can hold more moisture even if you accidentally overcook by 5-10 degrees. Think of longer brining as “dry turkey insurance.”
Tip 2: Air Circulation is Essential: Always use a wire rack during brining and roasting. Direct contact with a solid pan creates soggy spots on the skin and prevents even heat distribution. The rack allows air to circulate completely around the bird, ensuring uniformly crispy skin and even cooking.
Tip 3: Don’t Skip the High-Heat Start: Starting at 425°F for 30 minutes creates immediate browning and renders fat from under the skin. This high-heat blast also jump-starts the cooking process, reducing total roasting time. Then dropping to 325°F ensures gentle, even cooking that prevents the breast from drying out while the thighs finish.
Serving Suggestions
Starchy Sides: This brine turkey recipe pairs beautifully with classics like creamy mashed potatoes, herb stuffing, sweet potato casserole, or wild rice pilaf. The deeply seasoned turkey needs simple sides that let it shine.
Vegetable Pairings: Roasted Brussels sprouts with bacon, honey-glazed carrots, green bean casserole, or a crisp autumn salad with cranberries and pecans provide freshness and texture contrast.
Pan Gravy: After removing the turkey, pour pan drippings through a fat separator. In a saucepan, melt 4 tablespoons butter, whisk in 4 tablespoons flour, and cook for 2 minutes. Gradually whisk in 3 cups defatted drippings plus chicken broth. Simmer until thickened, about 8 minutes. The brine creates such flavorful drippings that your gravy needs minimal seasoning.
For more poultry cooking techniques, explore The Ultimate Guide to Cooking Chicken: Techniques & Tips.
Storage & Reheating
Refrigerator: Carve turkey within 2 hours of cooking. Store white and dark meat separately in airtight containers for 3-4 days maximum. The dry brine’s salt content helps preserve the meat slightly longer than un-brined turkey.
Freezing: Slice or shred meat and portion into freezer bags. Press out air, seal, and freeze flat for up to 4 months. Label with the date and meat type (breast vs. thigh). Frozen brined turkey stays moister than un-brined turkey even after reheating.
Reheating: The key is low heat with added moisture. For sliced turkey, arrange in a baking dish, add ½ cup broth, cover tightly with foil, and warm at 300°F for 25 minutes. For shredded turkey, reheat in a covered skillet over medium-low heat with ¼ cup broth, stirring occasionally. Microwaving creates rubbery texture—always use 50% power in 1-minute intervals if you must microwave.
Frequently Asked Questions
Is it safe if the meat near the bone is slightly pink?
Yes, if your thermometer reads 165°F (74°C). Younger turkeys sometimes have pink bone marrow that leaches into nearby meat during cooking—this is harmless. Smoked meats can also remain pink. Temperature is the only reliable safety indicator, never color alone.
Can I use a frozen turkey for this brine turkey recipe?
Absolutely, but it must be completely thawed first. Thaw in the refrigerator for 1 day per 4 pounds (3-4 days for a 12-14 lb turkey). Never thaw on the counter—bacteria multiply rapidly at room temperature. Check the label: pre-brined or “enhanced” turkeys should not be dry brined.
How do I get extra-crispy skin?
Three techniques guarantee crackly skin: (1) Dry thoroughly before applying salt, (2) Refrigerate uncovered for the full 48-72 hours so skin dries completely, and (3) Start at high heat (425°F) for the first 30 minutes. Some cooks also finish under the broiler for 3-5 minutes, watching constantly.
What’s the difference between wet brining and dry brining?
Wet brining submerges turkey in saltwater for 12-24 hours. It works but requires huge containers, dilutes flavor, and creates soggier skin. Dry brining delivers the same moisture benefits with better flavor, crispier skin, and zero equipment hassle. Dry brining is simply superior for home cooks.
Conclusion
This brine turkey recipe proves that restaurant-quality results don’t require complicated techniques or professional equipment. By understanding how salt restructures proteins and moisture behaves, you can transform any turkey into a juicy, flavorful masterpiece with impossibly crispy skin.
Remember the key principles: use kosher salt at 1 tablespoon per 5 pounds, refrigerate uncovered for 24-72 hours, start hot and finish gentle, and always verify 165°F with a thermometer. Master this brine turkey recipe, and you’ll never serve dry, bland turkey again.
Did this brine turkey recipe revolutionize your holiday cooking? Leave a comment sharing your results—I love hearing success stories from readers!